Replacing My Boat's Steering System
June 2010

In June 2010, the two steering cables in my bass boat (a 1993 19'3" Ranger 391V with a setback plate) had become so stiff that it was hard to turn the steering wheel. It was a good bicep workout, but I was ready for some easier turning. As I researched replacing my cables, I decided that it was probably time to replace the "helm" too (i.e. the part under the steering wheel - it contains the pinion gear). Several boat mechanics wanted $700 just to replace the cables. It would have cost me $1,000 to have them replace the cables and the helm. After doing some reading on the net, I bought the Seastar SS15214 "kit" which includes a new helm, a new dual cable (14 foot long cables) and a new bezel. I bought the kit for $340 (including shipping) at BlackBearSportingGoods.com (they had the lowest price by far). I saved well over $600 by doing this project myself. It wasn't exactly a simple job, but it ended up being a hair easier than I expected. It took me roughly 3 hours to complete the installation. Here are a few pictures detailing the work. If I ever have to do this again, this page may be of some help to my aging memory :) Perhaps it will be of some help to you too.
Note that the SS15214 kit contains an NFB (No FeedBack) helm. An NFB helm sorta "locks" the steering wheel in place when traveling at high speed so that you don't have to fight prop torque - thus saving you a little arm fatigue during a long drive at high speed. You can override it by giving the steering wheel a slight tug. Most people seem to like the NFB system, but I find it a bit annoying.

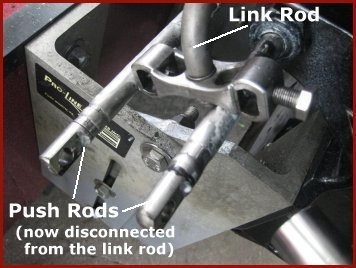
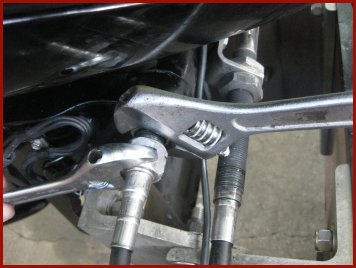
Disconnect the old steering cables from aft end of boat. Note that my steering system is a rack & pinion system. That means that each cable has a permanently attached "push rod" on one end, and a permanently attached "rack" on the other end (i.e. the end that is attached to the "helm" under the steering wheel). I first removed the cables from the back of the boat. The ends of the steering cables (i.e. the push rods) are attached to the link rod which pushes on the engine causing the boat to turn. So I removed the bolts securing the push rods to the link rod and then went to the other side of the engine and loosened the big retainer nuts at the end of each cable sheath. I was then able to pull the cables out of their tubes. Note that the engine should now pivot very easily from side to side. If it doesn't then the stiff steering may be due to the engine swivel point not being greased or the swivel bearing needs to be replaced.
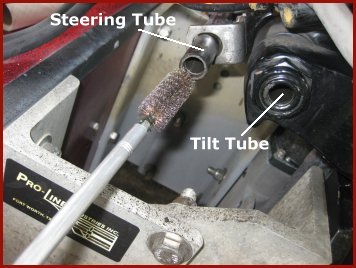
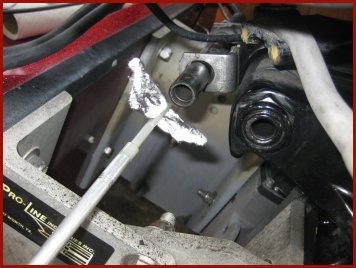
With the steering cables out of their tubes, I was able to clean the inside of the steering tube and the tilt tube by spraying WD-40 (which acts as a solvent to break up old grease) inside the tubes, and then I ran a wire cleaning brush designed for a 12-gauge shotgun through both tubes. After that, I ran several gun patches through the holes until they came out clean. Then I sprayed white lithium grease (it comes in a spray bottle) inside both tubes.


I detatched the old racks from the helm via unbolting 8 bolts (top picture). Whoever originally wired my boat used the racks and cables as places to zip-tie electrical wires to. So I had to carefully cut five or six zip-ties and secure the wires elsewhere. Once the racks were free from the helm, I was able to drag both steering cables out of the boat, pulling from the helm end. In the above picture I had already removed one rack/cable assembly and was in the process of removing the second one. Note that I tied a rope to the aft end of that second cable before I pulled it out of the boat. I then left that rope in place. Later on I'll use that rope to pull the new cable from the helm towards the rear of the boat.
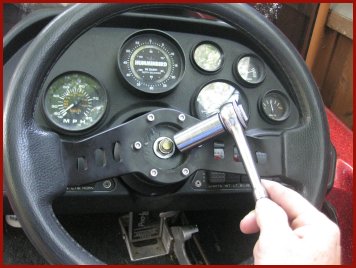

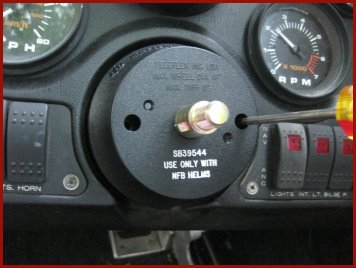
Remove the steering wheel from the top of the helm. There was as a "Ranger" dust cap that I first popped off to reveal the main nut holding the steering wheel to the helm. After removing that nut, I had to use my knees to force the steering wheel off the shaft. Like many steering shafts, mine had a "woodruff key" which helped hold the wheel onto the shaft. A woodruff key is a small, half-moon shaped piece of metal that fits in a grove on the shaft; a special tool was NOT required to remove the key or the steering wheel. But the woodruff key did cause me to have to pull very hard on the wheel to get it off. I read that it helps to lightly tap on the end of the shaft with a hammer as I pulled on the wheel - that trick worked.
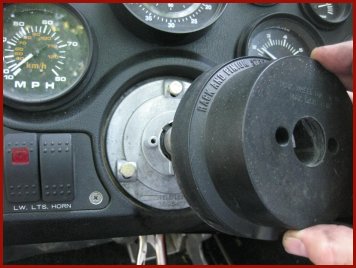

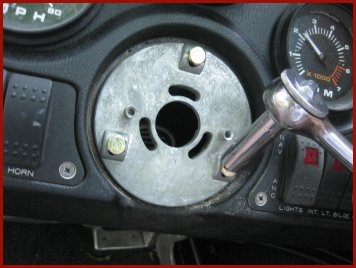
Two small screws hold the plastic bezel to the metal mounting plate. After the bezel was removed (left picture), the metal mounting plate was removed (right picture) by backing out three bolts. The old helm was stuck to that old mounting plate and came out of the dash with it. I'll be installing a new mounting plate, new bezel, new helm and a new rack/dual-cable assembly.

The new parts. Notice that my new helm has room for only one rack/cable assembly to be attached to it even though my boat's steering system needs two cables. All is well because the new rack I'm using has two factory-attached cables coming out of it.

Using the rope left behind from Step 3, I pulled the new dual-cable through the starboard side gunwale of the boat. I inserted the new push rods into the steering tube and tilt tube, and then I connected the push rods to the link rod (see Step 1). I tightened the large cable nuts on the other side of the engine. This completed the work that I had to do on the aft end of the new steering cables.

I bolted the the new rack (which is factory attached to the new cables) to the new helm.
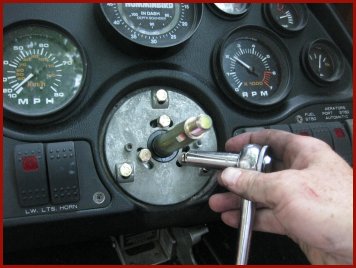
I installed a new metal mounting bracked to the dash. Then I poked the new helm/rack-cable assembly up through the new mounting bracket and bolted the assembly to the bracket.

I installed the new plastic bezel over the shaft of the new helm. I inserted a woodruff key into the shaft and then firmly pressed the steering wheel onto the shaft. I tightened the large nut at the top of the shaft (see step 4) and then replaced the dust cover in the center of the steering wheel. Project completed. The new system turns like a dream compared to the old one!
Return to my home page